
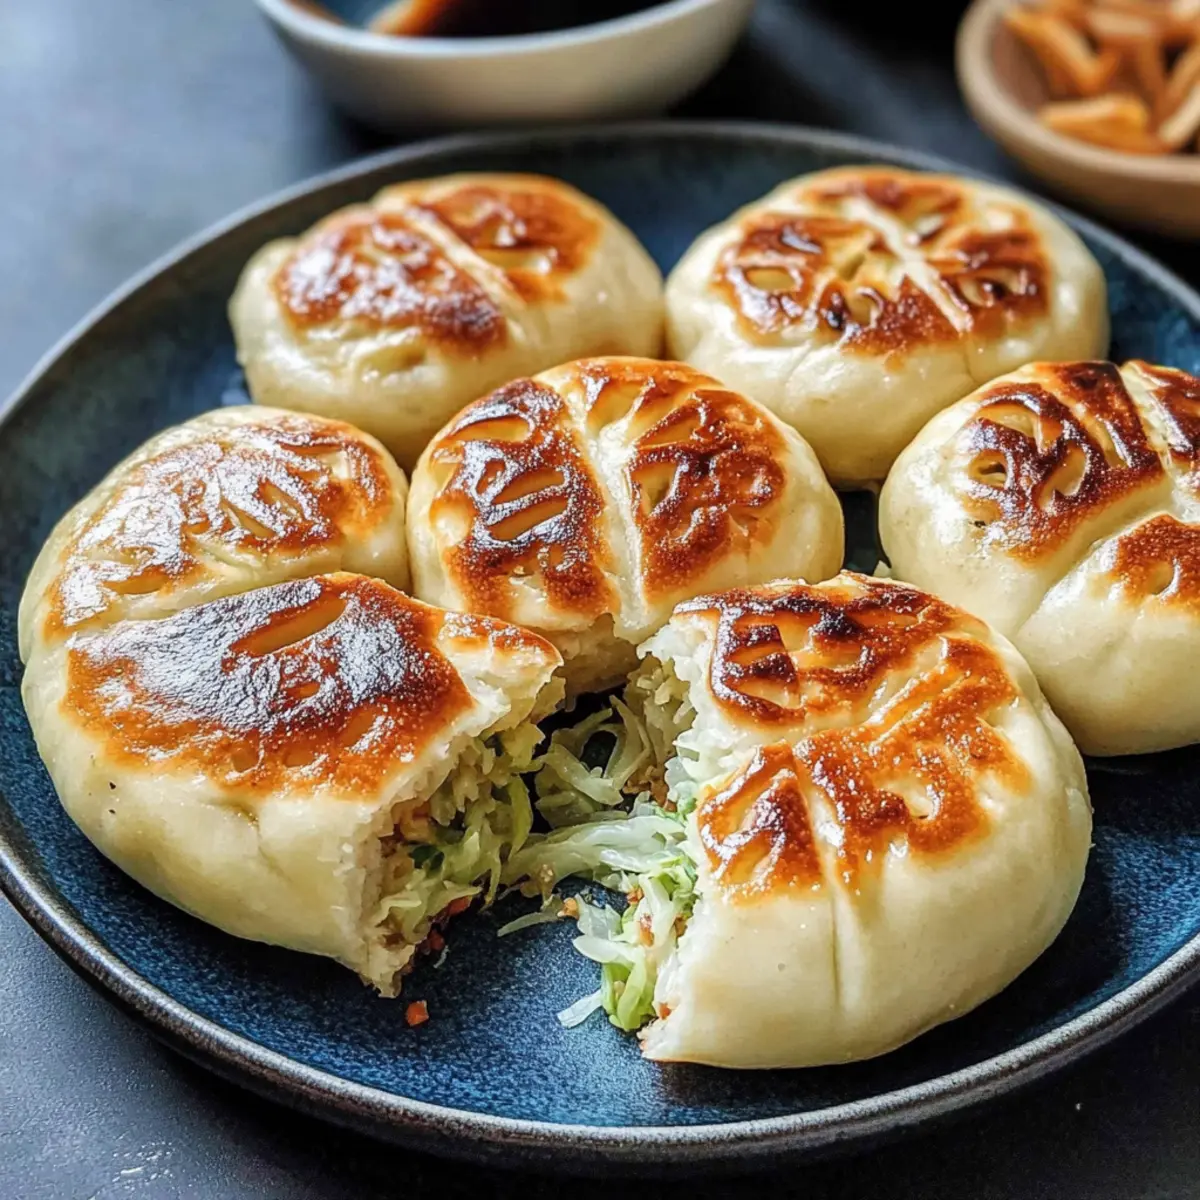
As I stood in my kitchen, the aroma of sizzling vegetables transported me to the bustling streets of Taipei, where vendors proudly serve their famed dumplings. Today, I’m delighted to share my recipe for Vegan Pan-Fried Cabbage and Noodle Buns, a delicious twist on traditional street food. These delightful buns are filled with a vibrant mix of cabbage, vermicelli noodles, and vegetables, all wrapped in a homemade dough. Not only are they quick to prepare, making them perfect for busy weeknights, but they also freeze beautifully, allowing you to enjoy this comforting treat whenever the craving strikes. Curious to see how you can whip up these crispy, satisfying bites right in your own kitchen? Let’s dive in!
Why Are These Buns So Irresistible?
Crispy, Delightful Texture: Each bun offers a perfectly golden exterior while keeping a soft, chewy inside that will keep you coming back for more.
Bursting with Flavor: A tantalizing mix of seasoned cabbage, vermicelli noodles, and aromatic vegetables creates a savory filling that’s truly irresistible.
Easy to Make: The straightforward method means you can whip these up quickly, making them a favorite for busy weeknights.
Freezer-Friendly: Prepare a big batch and store them in the freezer for a convenient snack or meal—just reheat straight from frozen! Consider pairing them with a quick dip like in my Caramelized Onion Goat recipe for an extra kick.
Crowd-Pleaser: These vegan buns are sure to impress friends and family at your next gathering, elevating your home-cooked offerings without all the fuss!
Pan-Fried Cabbage and Noodle Buns Ingredients
For the Dough
• All-purpose flour – Provides structure and chewiness; can be substituted with gluten-free flour.
• Instant dry yeast – Acts as a leavening agent; active dry yeast can be used but requires proofing.
• Sugar – Enhances flavor and aids fermentation; can be reduced slightly without direct substitutes.
• Salt – Essential for flavor balance; do not omit for best results.
• Warm soy milk (or non-dairy milk) – Hydrates the dough and adds richness; any plant-based milk works well.
• Toasted sesame oil (or neutral oil) – Adds flavor and moisture; can be replaced with olive or vegetable oil.
For the Filling
• Raw shredded cabbage – Main filling that provides bulk and moisture; other greens like napa cabbage can substitute.
• Uncooked vermicelli noodles – Adds texture to the filling; can be replaced with thin rice noodles or omitted for fewer carbs.
• Finely shredded carrot – Adds sweetness and vibrant color; other shredded vegetables such as zucchini may be used.
• Chopped scallions or chives – Provides extra flavor to the filling; optional substitutes include leek or shallots.
• Soy sauce – Imparts umami to the filling; use tamari for a gluten-free option.
For Cooking
• Neutral oil (for cooking) – Used for sautéing the filling; any medium-high heat oil will work.
• Roasted sesame seeds – Optional garnish to enhance texture and nutty flavor.
Remember, these Pan-Fried Cabbage and Noodle Buns are not just tasty; they’re also a delightful way to explore homemade vegan goodness!
Step‑by‑Step Instructions for Vegan Pan-Fried Buns with Cabbage and Vermicelli Noodles
Step 1: Prepare the Dough
In a large mixing bowl, combine 3 cups of all-purpose flour, 1 packet of instant dry yeast, 1 tablespoon of sugar, and a pinch of salt. Create a well in the center and pour in 1 cup of warm soy milk and 2 tablespoons of toasted sesame oil. Mix until a shaggy dough forms, then knead for about 8-10 minutes until smooth. Cover the bowl with a damp cloth and let it rise in a warm place for 2 hours, or until doubled in size.
Step 2: Cook the Filling
While the dough rises, soak 1 cup of uncooked vermicelli noodles in boiling water for about 5-7 minutes until soft; drain and set aside. In a large skillet, heat 2 tablespoons of neutral oil over medium heat. Sauté 2 cups of raw shredded cabbage, 1 shredded carrot, and ¼ cup of chopped scallions for 4-5 minutes until the vegetables soften. Stir in the drained vermicelli noodles, 1 tablespoon of soy sauce, and season to taste before allowing the filling to cool.
Step 3: Make the Wrappers
Once the dough has risen, punch it down and turn it onto a floured surface. Divide the dough into 12-16 equal pieces, rolling each piece into a ball. Using a rolling pin, flatten each ball into a thin round wrapper, about 4-5 inches in diameter. Aim for an even thickness to ensure they roll out nicely without tearing. Gather all your wrappers and keep them covered to prevent drying out.
Step 4: Form the Buns
Take one wrapper and place a generous spoonful of the cooled filling in the center. Carefully gather the edges of the dough around the filling, pinching and twisting to ensure a secure seal. Repeat this process for each wrapper, making sure all the buns are tightly sealed. Arrange the prepared buns on a plate, seam side up, while you get ready to cook them.
Step 5: Cook the Buns
In a large non-stick skillet, heat 2 tablespoons of neutral oil over medium-high heat. Carefully place the buns in the skillet, creased side down, and pan-fry for about 4-5 minutes until they turn golden brown. Add ½ cup of water to the skillet, cover immediately, and steam for 5-6 minutes until fully cooked and fluffy. Remove the lid for the last minute to let any excess moisture evaporate before serving.
Step 6: Serve and Enjoy
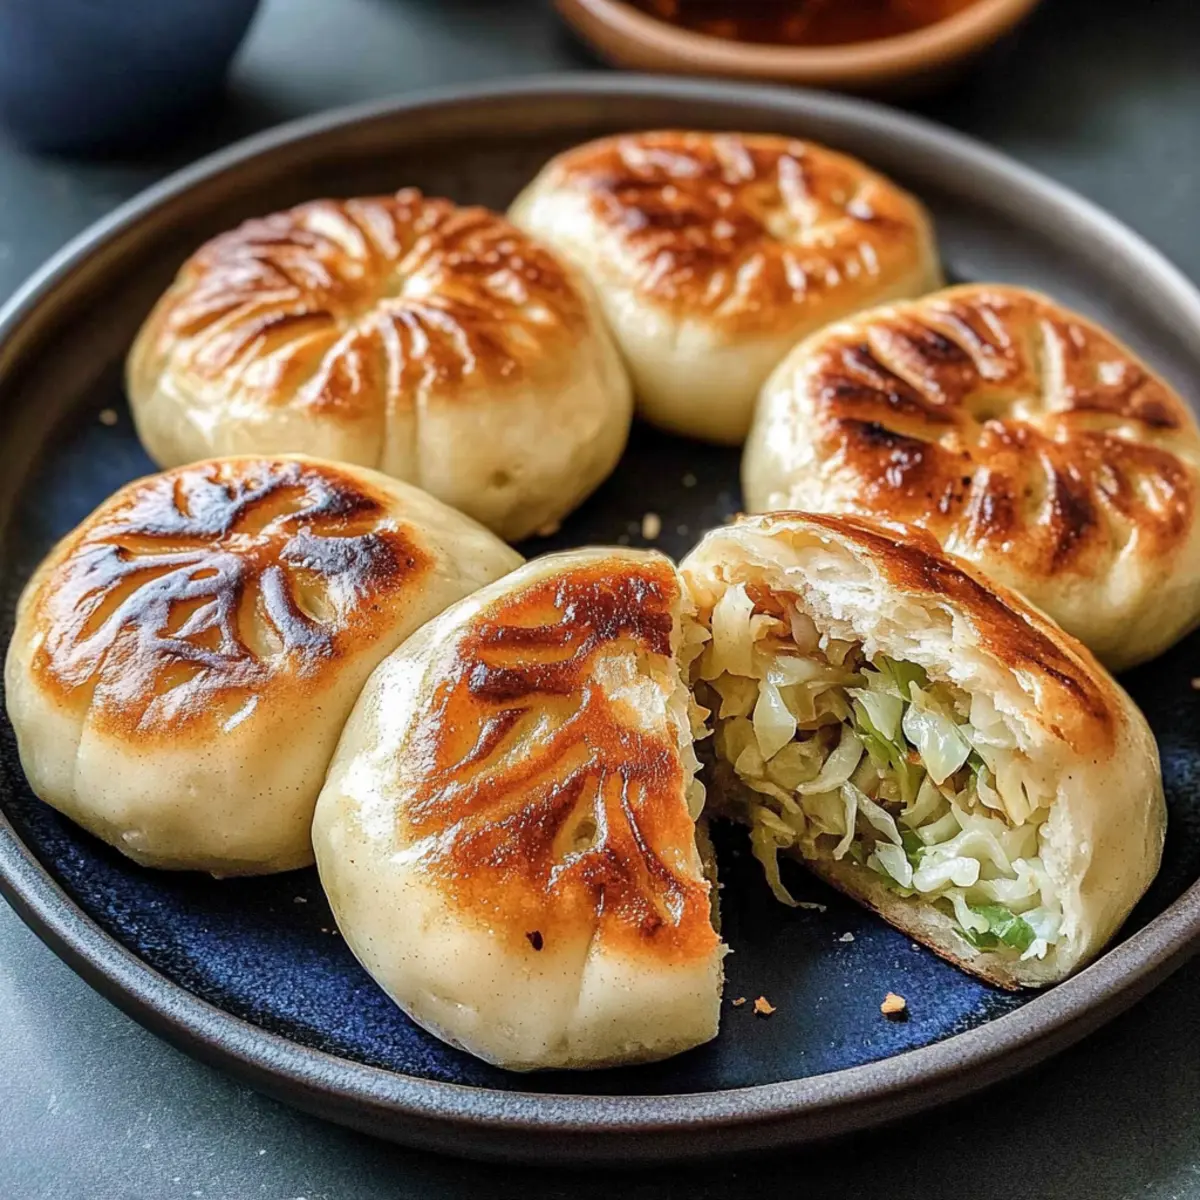
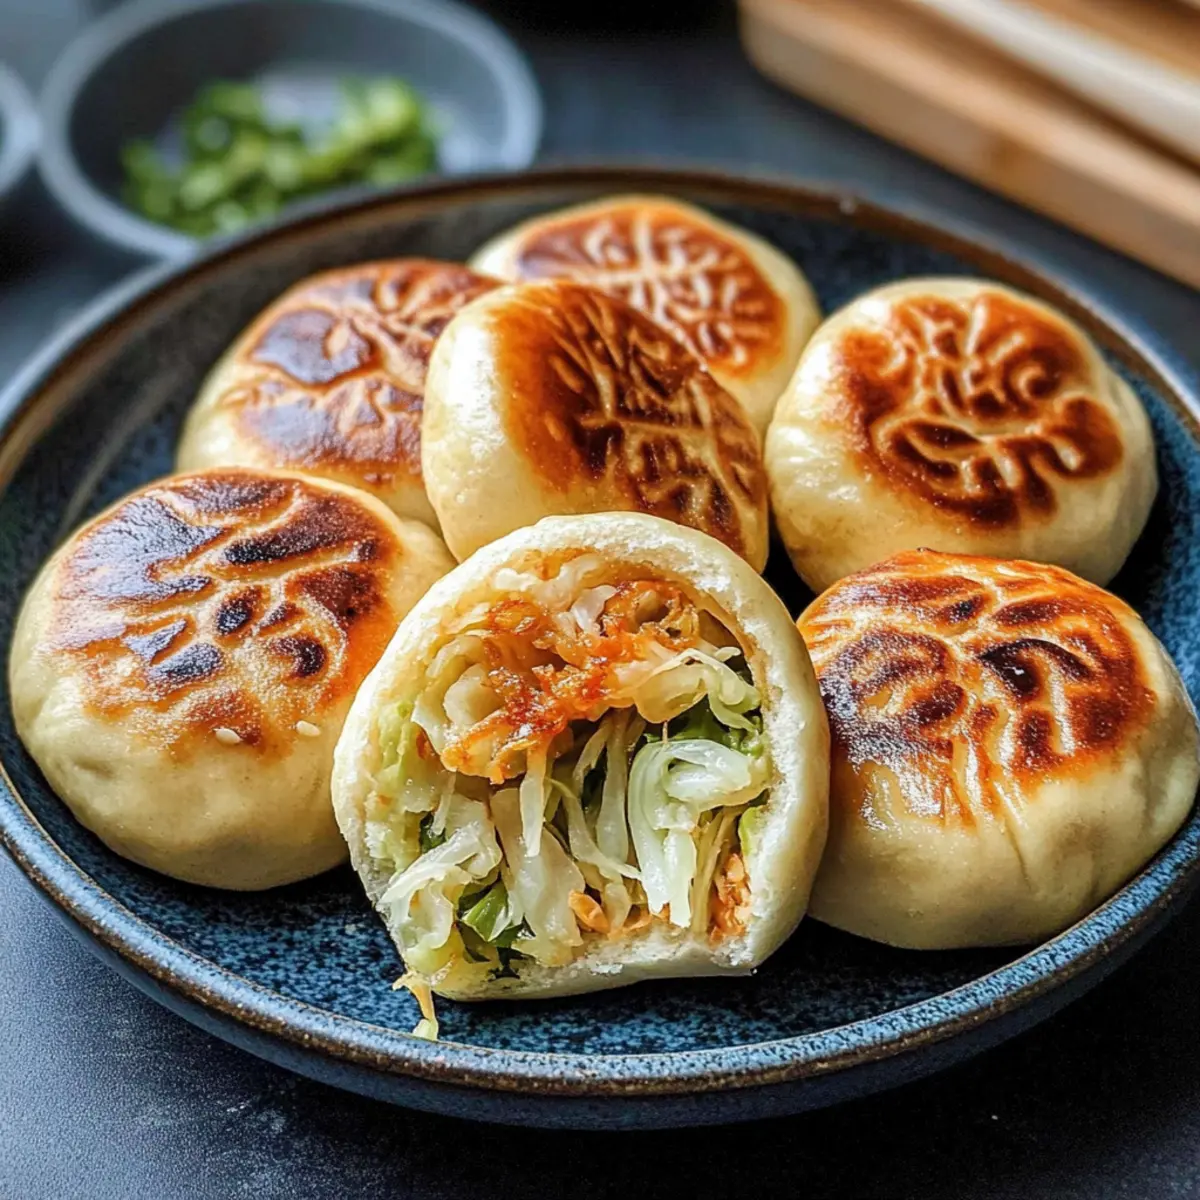
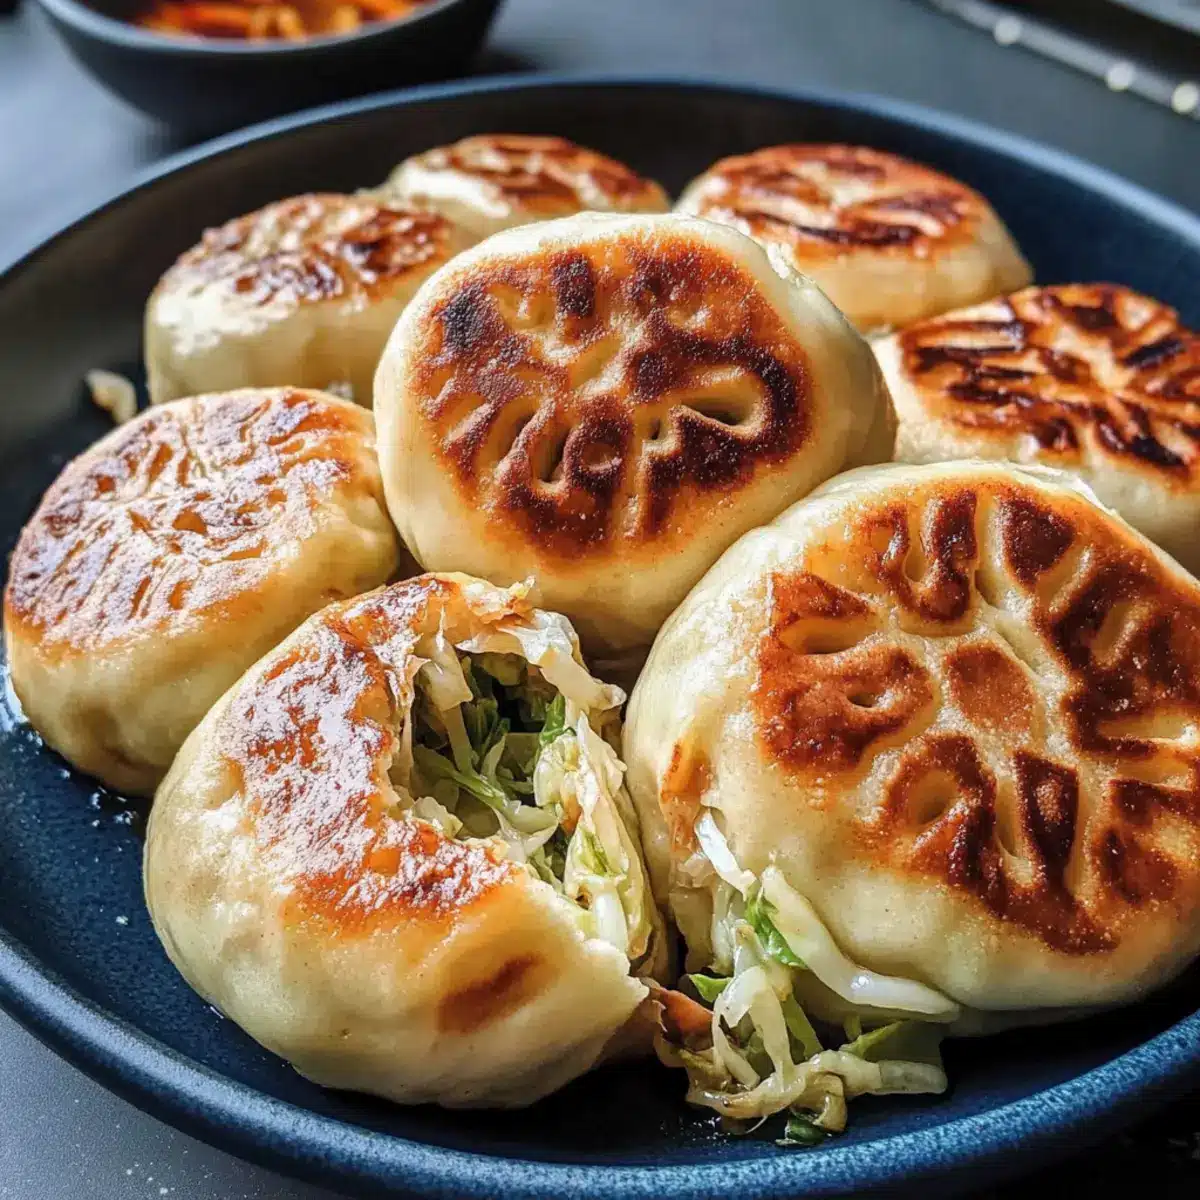
Once your Vegan Pan-Fried Buns with Cabbage and Vermicelli Noodles are beautifully golden and steamed, transfer them onto a serving plate. Garnish with a sprinkle of roasted sesame seeds if desired. These delightful buns are best enjoyed hot, paired with a zesty soy dipping sauce. Dig in and savor these comforting bites that encapsulate the essence of homemade goodness!
How to Store and Freeze Pan-Fried Cabbage and Noodle Buns
Fridge: Store the buns in an airtight container for up to 5 days to maintain freshness. It’s best to layer them with parchment paper to prevent sticking.
Freezer: For longer storage, freeze the buns individually by placing them on a baking sheet until solid, then transfer to a freezer bag. They can last for up to 3 months.
Reheating: To enjoy your frozen Pan-Fried Cabbage and Noodle Buns, simply pan-fry or steam them directly from frozen. This keeps their crispy exterior intact while ensuring they’re heated through.
Serving Tip: Consider serving with a delicious dipping sauce to elevate your eating experience!
What to Serve with Vegan Pan-Fried Buns
These delightful bites will not only stand out on your table but also harmonize beautifully with a variety of sides.
-
Sweet and Spicy Chili Sauce: A vibrant dipping sauce that elevates the flavor of the buns, balancing their savory filling perfectly.
-
Crispy Asian Slaw: This crunchy, tangy salad featuring cabbage, carrots, and sesame dressing adds a refreshing contrast to the warm, comforting buns.
-
Miso Soup: A warm and umami-rich soup to complement the savory notes of the buns, creating a delightful, cozy meal together.
-
Stir-Fried Greens: A medley of quickly sautéed bok choy and garlic brings a fresh, light side, enhancing your meal’s overall flavors and colors.
-
Steamed Edamame: Simple yet satisfying, these lightly salted pods add a fun finger-food element that pairs nicely with the buns’ textures.
-
Chilled Pickled Vegetables: Tangy, crunchy pickles offer a refreshing contrast to the vegan buns, providing a zesty kick that will awaken your palate.
-
Jasmine Rice: Fluffy rice acts as a wonderful base, soaking up any leftover sauce and serving as a delightful accompaniment to your meal.
-
Iced Green Tea: A refreshing beverage that adds a cooling balance to the warm, richly flavored buns, it’s the perfect thirst-quencher for your meal.
Pan-Fried Cabbage and Noodle Buns Variations
Feel free to explore these delicious tweaks and swaps that will let you personalize your buns to your taste!
-
Mushroom Medley: Substitute the filling with sautéed mushrooms for an earthy flavor. Chanterelles or shiitakes work wonders here!
-
Hearty Addition: For a heartier option, mix in some plant-based ground meat with your veggies. It adds protein and makes for a filling snack.
-
Spicy Kick: Enhance the filling by adding a teaspoon of chili paste or fresh ginger. Your taste buds will appreciate this extra warmth!
-
Veggie Swap: Experiment with different seasonal vegetables, such as bok choy or spinach, for a fresh take on the filling. Each vegetable brings its own personality!
-
Dough Delight: Try adding herbs like cilantro or chives into your dough for an aromatic twist. It elevates the flavor even more!
-
Sweet & Savory: Incorporate some finely chopped sweet bell peppers for a splash of sweetness and color. It’s a tasty way to brighten up your buns!
-
Gluten-Free: Use gluten-free flour if you’re looking to adapt this recipe for dietary needs. The texture remains satisfying, even without traditional flour.
-
Asian Fusion: For a unique twist, try adding a splash of lime juice and zest to the filling for a zesty Asian fusion. It’s refreshing and vibrant!
Whichever variation you choose, these Pan-Fried Buns will become a comforting staple in your kitchen, much like my beloved Thai Red Curry Noodle recipe!
Tips for the Best Pan-Fried Cabbage and Noodle Buns
-
Dough Rising: Make sure your dough has fully risen before shaping; this ensures the buns are airy and fluffy.
-
Non-Stick Success: Use a non-stick pan to prevent sticking. If you’re using a regular pan, don’t skimp on the oil!
-
Wrapper Thickness: Roll your wrappers evenly; too thin can lead to tearing, while too thick may result in chewy buns.
-
Filling Cool Down: Allow your filling to cool completely before sealing the buns to prevent sogginess and help maintain their shape.
-
Steaming Technique: When adding water for steaming, cover immediately to trap steam for even cooking—avoid opening the lid too soon!
These tips will help you achieve perfect Pan-Fried Cabbage and Noodle Buns every time!
Make Ahead Options
These Vegan Pan-Fried Cabbage and Noodle Buns are perfect for meal prep enthusiasts! You can prepare the dough and filling up to 24 hours in advance, making your weeknight cooking easier. Simply mix the dough and let it rise, then cook the filling and let it cool before combining. Store the wrapped buns in an airtight container in the fridge for up to 3 days or freeze them for a quick snack later. When you’re ready to enjoy, pan-fry or steam them straight from the fridge or freezer—no need to defrost! This method ensures they remain just as delicious, with that crispy exterior and chewy interior you crave.
Pan-Fried Cabbage and Noodle Buns Recipe FAQs
How do I select the best cabbage for the filling?
Absolutely! Look for cabbage that is firm with tightly packed leaves and a vibrant green color. Avoid any cabbages with dark spots or wilting, as these indicate spoilage. For this recipe, Napa cabbage or Chinese cabbage can be great substitutes if you prefer a slightly sweeter taste and delicate texture.
What is the best way to store leftover buns?
Very! To keep your Pan-Fried Cabbage and Noodle Buns fresh, store them in an airtight container in the fridge for up to 5 days. I always recommend layering parchment paper between buns to prevent them from sticking together, ensuring each bite remains perfect when you’re ready to reunite with them.
Can I freeze the buns for later use?
Absolutely! For optimal freezing, place the assembled buns on a baking sheet lined with parchment paper and freeze them until solid. Once frozen, transfer them to a freezer bag, which can last up to 3 months. When you’re ready to enjoy, you can cook them straight from frozen—just pan-fry or steam them until heated through and crispy.
Why are my buns sticking to the pan?
Very often, this happens if you’re not using enough oil or if you’re not using a non-stick pan. I recommend preheating your pan and adding a generous amount of neutral oil. If you’re using a regular pan, make sure to check that it’s well-oiled before placing the buns in it, and give them a gentle nudge with a spatula if they seem to stick!
Are these buns suitable for gluten-free diets?
Absolutely! You can make these buns gluten-free by substituting all-purpose flour with a 1:1 gluten-free flour mix. Just be sure your yeast is gluten-free as well; brands like Bob’s Red Mill often label their products for special dietary needs. The texture might vary slightly, but they will still be delicious.
What should I do if my dough isn’t rising?
If your dough isn’t rising, it could be due to a few factors. First, ensure your yeast is fresh and active. In the future, remember to proof your yeast in warm water with a little sugar to ensure it’s bubbly before incorporating it into the dough. If your kitchen is cold, try placing the dough in a warm, draft-free space, like an oven with just the light on to provide warmth.
Savory Pan-Fried Cabbage and Noodle Buns You’ll Love
Ingredients
Equipment
Method
- In a large mixing bowl, combine 3 cups of all-purpose flour, 1 packet of instant dry yeast, 1 tablespoon of sugar, and a pinch of salt. Create a well in the center and pour in 1 cup of warm soy milk and 2 tablespoons of toasted sesame oil. Mix until a shaggy dough forms, then knead for about 8-10 minutes until smooth. Cover with a damp cloth and let it rise in a warm place for 2 hours, or until doubled in size.
- While the dough rises, soak 1 cup of uncooked vermicelli noodles in boiling water for about 5-7 minutes until soft; drain and set aside. In a large skillet, heat 2 tablespoons of neutral oil over medium heat. Sauté 2 cups of raw shredded cabbage, 1 shredded carrot, and ¼ cup of chopped scallions for 4-5 minutes until the vegetables soften. Stir in the drained vermicelli noodles, 1 tablespoon of soy sauce, and season to taste before allowing the filling to cool.
- Once the dough has risen, punch it down and turn it onto a floured surface. Divide the dough into 12-16 equal pieces and roll each into a ball. Using a rolling pin, flatten each ball into a thin round wrapper, about 4-5 inches in diameter. Keep the wrappers covered to prevent drying out.
- Take one wrapper and place a generous spoonful of the cooled filling in the center. Carefully gather the edges of the dough around the filling, pinching and twisting to ensure a secure seal. Repeat for each wrapper, making sure all buns are tightly sealed. Arrange on a plate, seam side up.
- In a large non-stick skillet, heat 2 tablespoons of neutral oil over medium-high heat. Carefully place the buns in the skillet, creased side down, and pan-fry for about 4-5 minutes until golden brown. Add ½ cup of water to the skillet, cover immediately, and steam for 5-6 minutes until fully cooked and fluffy. Remove the lid for the last minute to evaporate excess moisture before serving.
- Transfer the buns onto a serving plate. Garnish with roasted sesame seeds if desired. Best enjoyed hot, paired with a zesty soy dipping sauce.
Leave a Reply